Is Your Make Up Working For You?
TLDR: In this post I go over helpful makeup tips and how to apply your makeup the right way. I know it’s an art that requires so much practice. Hopefully this will make it easier for you all!
Table of Contents:
Preparation and Helpful Tips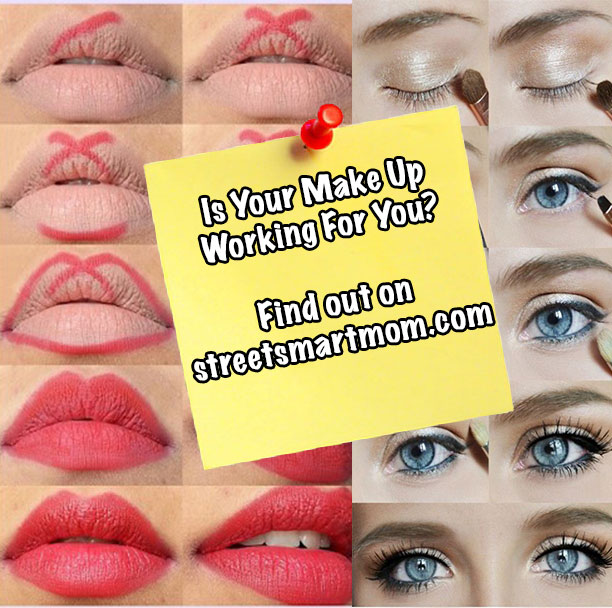
DIY Eye Makeup Remover
Eyes
-
Blue Eyes
-
Green Eyes
-
Brown Eyes
Brows
Lips
Nose
Cheeks
Face
-
Oval Faces
-
Round Faces
-
Square Faces
-
Heart Faces
My beautiful, Smart Moms!
I’m excited about this blog post.
I knew in theory I wasn’t allowed to wear makeup until I was 12.
In theory, because I tried getting away with it from the time I was old enough to smear my mother’s lipstick all over my face and bathroom mirror.
I would sneak little bits of makeup at school before I was 12 and try to wipe it off before coming home. Of course my mother noticed. She put up with my rebellious arguing for years. And finally, the day of my 12th birthday arrived.
I came down the steps ready for school with my hair curled. I had carefully applied dark red lipstick, turquoise eyeshadow (heavy and smudged out of line), and purple glitter mascara (I know, cringe…why would anyone put glitter on mascara?). Oh, and don’t forget the ruddy pink cheeks! I thought I was gorgeous.
My mother didn’t say anything that day.
And she didn’t say anything for the next few weeks.
It wasn’t until a friend tried to politely tell me I looked “weird” and the popular girl (who got to wear makeup before 12) said I looked like a circus not-so-nice-name that I finally realized how ridiculous I looked.
I burst into tears at home. My mother let me cry on her, letting me learn my lesson from all the years of heck I’d given her. I hated her for a few days, but came around quickly when she taught me how to apply everything.
Applying make-up was something I picked up quickly. I even did other girls’ hair and makeup for all our school dances. Yep, I was the go-to expert in my teens.
I kind of tapered off somewhere though.
Between early morning college classes and having kids, makeup kind of fell to the wayside (so did hair a lot of days).
In the last year I’ve really started enjoying it again as the art it is. I follow some awesome youtubers who do tutorials and of course Pinterest has some good ideas. So I’m going to share with you a collection of tips and tricks I’ve found most helpful.
Preparation and Helpful Tips
Ok, so this is going to look different depending on your budget, amount of time you want to spend on makeup, and how in depth you want to go.
Makeup brushes are an important part of application.
Synthetic brushes are good for cream and liquid products because it doesn’t absorb much of the product, the bristles tend to stick together which manages a smooth finish with liquid, and it can be more precise so it would be better to apply eyeliner and other precise lines with a synthetic brush.
Natural hair brushes are great to use as well. Make sure they are smooth and not bristley. These brushes are good for powder products. They have more texture and can pick up the powder better, making blending the makeup easier.
I clean my brushes with my shampoo. I buy shampoo that is chemical free and vegan, so I don’t get any nasty chemicals on my hair or face. And vegan just means that it wasn’t tested on animals and, therefore, more humane. I usually press out the water with a towel then let them air dry while I’m out for the day. That way bacteria don’t build up on them. (Note: Do not soak the brushes as this can make the bristles come loose and fall out).
A lot of the time it is better to get higher end products. Yes, there are exceptions and substitutes. No you don’t have to spend a fortune. Just keep in mind you usually get what you pay for. And really good stuff usually lasts you a lot longer, making it worth the investment, and it looks so much better. There are some sales to watch out for on company websites or at your local mall too!
But don’t ever buy cheap, modified versions of brands. These knock offs have been found to be toxic and they are illegal. An example of this would be a product with the same brand name but obvious differences in lay out or colors. Buyer beware. These products have been found to have mercury, arsenic, and rat droppings.
Just don’t do it!
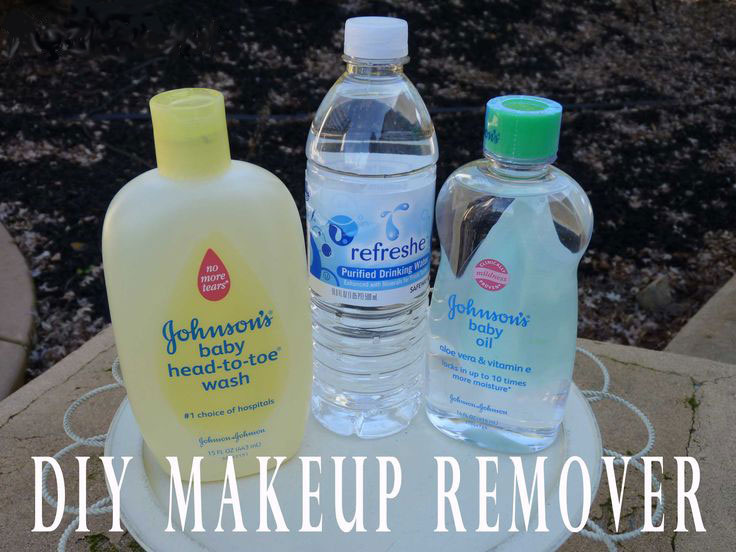
DIY Eye Makeup Remover
(Link from http://budgetrich.tumblr.com/post/17880195844/diy-eye-make-up-remover-1-cup-water-1-%C2%BD)
Eye makeup remover is just one of those things that adds up. Makeup and everything we use in maintaining our body gets so expensive. So I like to figure out how to diy a lot of things.
I found this diy makeup remover to work rather well, and it’s cheap to make.
Ingredients:
- 1 cup water
- 1 ½ tbs tear free baby shampoo
- 1/8 tsp baby oil
To prepare:
Put ingredients into a small bowl and mix them together. Pour contents into your bottle. Make sure it is one that has easy pour but won’t just spill out everywhere when you put it on a cotton ball or cloth.
Eyes
- Tired eyes? Wake them up with a spot of metallic pinkie blush on the center of your lower lashes. This will make them look more alert. Using a thick concealer or dark circle remover can erase those shadows under your eyes. I use a dual stick that has a lighter shade of concealer and shimmer to it and the other side has my regular skin tone concealer. This makes my shadows look lighter and my eyes brighter.
And even highlighter can work for under the eyes! - Yellow contradicts and removes the appearance of blue and purple, so use setting-powder that has its base in yellow to get rid of dark circles.
- Fan your eyelashes in towards your nose instead of outwards. This fans out your lashes rather than clumping them back together.
- I use a skin colored liner on the inside rim of my lower eyelashes, which makes my eyes look larger and bright. Using black on this line also makes my eyes pop.
- Going for a more dramatic look? Use dark shadow on the crease of your eye and apply some in a small triangle shape to the outside corner of your eyes.
- When I want things to start looking a little more fun, I create dimension on my lids by using multiple colors that are similar or complement each other.
- Puffy eyes? I run an ice cube over them in the morning to reduce swelling. Also, going with darker eye makeup can reduce the appearance of swelling.
- Do not use eye liner on the inner 1/3 of your eyes…or at least doing so makes them seem a little closer set. So it’s your call if that’s a no go for your face.
- I couple dark eye shadow with shimmer and some light so it doesn’t sink into my face.
- I love my q-tips for all my makeup error needs! Just get them a little wet with water or makeup remover and you’re golden.
- When I want to go with a more neutral smoky eye, I combine different browns and nudes to smudge together.
- I use shimmer or a white eye shadow on the inside corners of my eyes and then swipe up towards my brow bone to create a cool look for my eyes. It highlights that angle and looks cool.
- I find keeping it simple is the best way to go a lot of times. I often pair a simple shimmer/light eye shadow over my eyes with a dark shadow in my crease and black eye liner. The effect is simple and elegant.
- Try applying dark eye shadow with a damp and angled brush to the top or bottom lash line. This gives a unique alternative look to eyeliner and provides good eye definition.
- To complete a cat eye that I’m happy with, I usually start with the outside bottom lash line and move upward. I usually go a bit longer than I intend because it’s much easier to take length off than to add it on. Some of my friends use dashed lines and then connect the lines for easier control. Draw from your inside top lash across to meet the raised line and connect. Smudge or fill in the angle.
(Source)
-
Blue Eyes
Stick with browns, roses, and neutral shades of eyeshadow for the office. Lavendar is lovely for blue eyes and a dark plum is perfect for an evening look. Try rocking some metallics like silver and gold, as well as turquoise and icy pinks for some beautiful and sometimes dramatic looks.
If you’re tanned, warm colors in the yellow or orange family like rose gold, peach, bronze, and almond/coffee shades really make your eyes pop.
If you have fair skin, try pink undertones—tones like milk chocolate, blush, taupe, and mauve to compliment your blue peepers. -
Green Eyes
Purple is a great color to try out with green eyes because it is green’s complementary color on the color wheel. Tones like gold, copper, dark green, plum, lilac, and lavender are all great colors for your eyes. However, you want to avoid blue undertones.
It is recommended you avoid silver but gold (or even better, greens with gold flecks), bronze, and copper are great! -
Brown Eyes
Lucky you, most eye shadows look great with brown eyes!
If you have deep brown eyes then medium to dark shades of shadow is going to look great on you (plum, forest green, dark brown, mauves). Gold and bronze also rock on brown eyes.
If you have medium to light brown eyes then try out violet, bronze, and green tones. It looks cool to pair metallic eyeliner in your bronze colors with some neutral toned shadow.
Don’t be afraid of playing with metallic silver either!
Brows
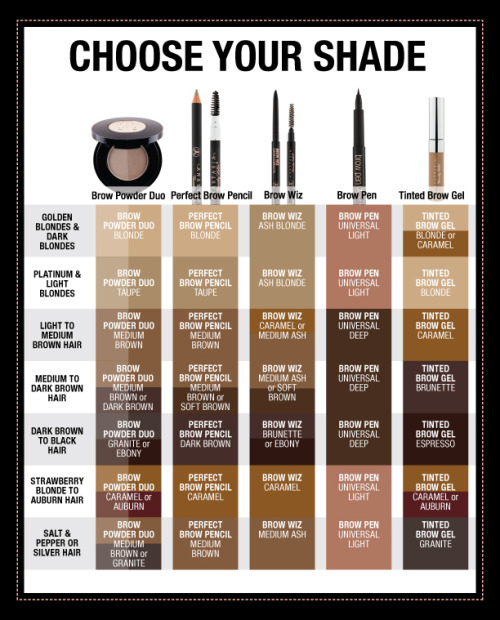
- Full eyebrows are all the rage right now. And in fact, I think eyebrows are the most looked at and complimented part of a perfect makeup ensemble. So it’s important to get the right shade for your face.
(Source)
- One cheat you can do is wet your makeup brush down and paint brown eye shadow over your brow. This will give you instant strong brows.
- Try filling in the eyebrow first before you tweeze so that you can see the natural shape you want and get rid of the rest.
- Use short, fine strokes to mimic hair.
- I make sure to never bring the front or end of my eyebrow down lower because it makes all of my features sink. Instead, I shape around the front and let the end trail out more instead of just down.
- Lean to the side of too much hair than not enough. More brow hair makes you look younger, and it’s easier to pluck than it is to grow back.
- The front of your brow should begin with the top part of your nose.
- The arch should be about ¾ away from the top of the nose bridge.
- The rest of the brow should taper naturally, go with the flow of your natural brow.
- Always wondered what that brush was on the end of your brow pencil? It’s a tool to lift and brush your brow hairs up and back so they don’t look so wild.
- The bottom part of your brow is an important part of detailing your eyebrows. One tip to help you narrow in on that area: hold the tweezers to your inner-arch and the front part of your brow to see what needs to be filled in.
- Put highlighter, translucent powder, or white eyeshadow on your brow bone.
Lips
- Got balm and lipstick? Perfect. Mix them together on the back of your hand then apply it to your lips with a sponge. This helps it slide on flawlessly.
- I think we all know this one, but just in case…spreading a lip gloss over matte lipstick can look really pretty! It adds dimension and shine.
- Going for a nude look? Use a lip scrub (you can pick some up at Ulta…also check out the diy exfoliating idea below) to buff your lips and bring your natural color to the surface.
- Your lips need to be exfoliated too. You can make your own with organic honey and raw sugar! Just leave it on your lips for around 5 minutes then work it into your lips with circular motions like any other exfoliator. This will help keep your lips moisturized and smooth.
- Lip balms are a good way to experiment with color and layer without the intensity of lipstick. Experimenting is part of the art (and fun) of lipstick. So pick out some favorite shades and have fun mixing and matching.
- Mixing lipstick is also a great way to get new and pretty colors! Whether you’re creating an ombre look with them or creating new shades, don’t be afraid to mix and experiment.
- Want fuller lips? Get the same shade of liner and lipstick and press on the liner first. This is defining your lips. So trace the natural lip line and don’t go outside the lines—but follow them all the way through. Fill your lips with the liner (this helps lipstick stay on longer) and then apply your lipstick.
- Going for wider lips? Line all the way out to your very most edges of your lips and out to the corners. Fill in with your matching lipstick and finish with gloss on the middle of your lips. And yes, it may take you a couple times to master this look. I had lips that looked like a stretched out balloon the first couple times.
- How about thinner? Just trace inside the lip line and color in with lipstick (hint: matte lipstick makes your lips appear smaller as well).
- What to give your lips natural definition? Trace your lips with a neutral pencil and fill in lips after with a sheer gloss. Blend the gloss towards the edges and what you get is a shimmery and shiny version of your natural beauty.
- Do you feel like you’re not getting the same color on your lips as what’s in the tube? That may be because the natural color of your lips is influencing the lip color. You want a nude canvas, which means you’ll want to smear your foundation on your lips first and blend it in so it looks like your skin. Then apply lipstick.
Nose
- Emphasize other features. You can draw attention and emphasis away from you nose by emphasizing your cheeks or pretty peepers.
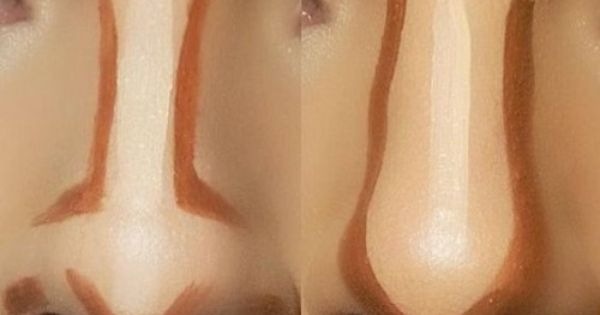
- You can make your nose appear thinner by adding a concealer two shades lighter than your skin to the sides of your nose. Go up the nostrils and over the bridge. If you have a flatter nose, put it on top of your nose too. If you have a long nose, stop an inch before your nose stops.
Add the two lines on the bridge (this is shaping your bridge) and make it as thin as you like
Then you blend everything together. Start with lighter products and end with darker products and set with a face powder.
Another way to do this is to apply two shades darker than your skin concealer to the sides of your nose and a lighter shimmer highlighter down the top of the bridge of your nose. Blend and finish. - If your nose is on the long side, just apply a darker shade of foundation to and under the tip of your nose. This makes your nose look shorter
Cheeks
- If you have dry skin, using a liquid or cream blush can help moisturize your skin.
- People with fair skin should be using blush with cool undertones. Those with darker skin tones should have warmer undertones.
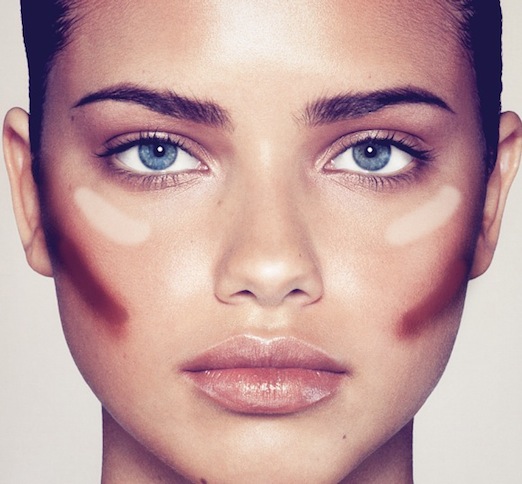
- I have been using CoverGirl’s Instant Cheekbones Contouring Blush to contour my cheekbones. It has three complimentary tones that work together and it’s affordable. To contour, you use the darkest shade in the hollow of your cheek below the cheekbone. Then use the medium shade along the cheekbone and the lightest shade on top of the cheekbone. Instant lift.
- I apply blush at the part of your apples nearest my nose and then work out. It covers the part of my cheeks that are part of the roundness that colors when I actually flush/blush.
- For more youthful looking makeup, put the blush on no lower than your nostril and do not apply closer to your nose than your pupil is.
Face
- You want to be working with a clean canvas before you apply foundation. I use Cetaphil (affordable at any department store) and then moisturize my face with a tiny bit of coconut oil (cheap and a lot goes a long way!). You kind of have to find the right cleanser and moisturizer for your skin as you go. What works for mine may not work for yours. I went through like 11 different cleansers before I found that that helped keep my face blemish free. The coconut oil really hydrates my skin and makes it look more dewy and fresh. When my skin really dries out I will use a more expensive moisturizing lotion (and I’ll even be bad and put pore-blocking heavy lotions on the parts that are struggling—I’ve never broken out from using them sparingly for really dry skin).
- If you have oily skin, it’s best to use a matte gel-based moisturizer. You just apply it with fingertips or a makeup brush.
- Find the correct foundation for your skin tone. If you put it on your jaw line, you shouldn’t be able to notice it in the sunlight without blending it. Go to a department makeup store and have an expert there help you find the correct tone. You can also take a sample of the shade they recommend for you in their store, take it to a more affordable drug store, and then tone-match the best you can to save some dollars (I have done this often when budgeting, and it works just fine).
- On deeper skin-tones, highlighting with an orange color corrector is recommended. This acts against the purple-dark tones around the eyes or mouth that can appear otherwise.
- To apply foundation, start in the middle or center of your face and then move outwards. Blend outward in a kind of rolling movement.
- If you just want a little bit of cover, use your fingers—if you want a lot, use a sponge. Beauty Blender Cosmetic Sponge is recommended on many sites to assist in applying foundation. Of course you can buy some cheaper versions of it (it’s about 20 bucks) at any department store; I don’t know if they work as well though. This cosmetic sponge is praised for being able to smooth out the foundation and blend it without taking too much off. Also, if you dampen the sponge, it makes it so it absorbs less foundation from you face. So I like it!
- I used to always put concealer on before foundation, but I learned that makes you use more than you need and foundation helps concealer be less full of creases.
- When picking out a concealer I usually go about a shade lighter than my skin tone. Don’t go too light!
- Putting on bronzer or highlighter before your foundation (not after) can cause a natural glow in your face. And it looks more smooth and natural.
- Apply foundation everywhere—that means eyes, lips, ears, neck, and even cleavage. This helps keep tone consistency in your appearance. You don’t need a lot in those areas either. Applying it on your eyes and ears helps your lipstick and shadow maintain a truer color.
- A favorite tip of mine is finishing off your base with translucent powder. Start at your hairline and work your way down to your cheekbone, over the bridge of your nose, over your other cheekbone and up to the opposite hairline. So it’s kind of a W shape. Using translucent and luminous powder will make your skin glow vs. the matte powder which doesn’t look as great. I love this finish, and I think you will too.
Oval Face
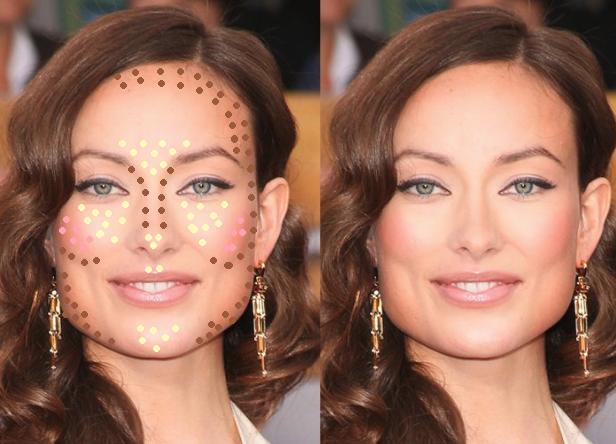
- Lucky you, you have a face shape that works with most makeup ideas.
- If your oval is on the longer side, flat brows look good on your face.
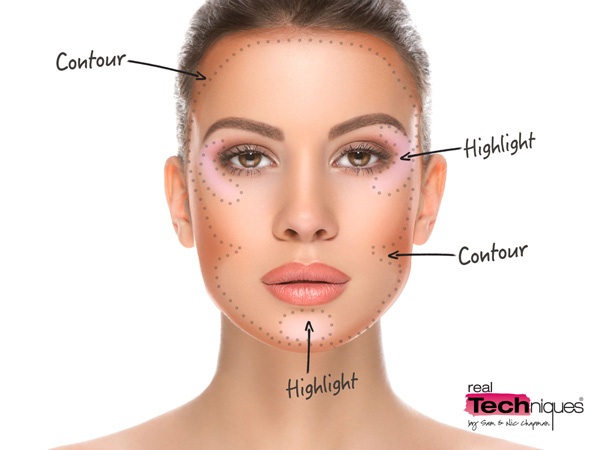
- Bring out the forehead and chin with highlighter on oval faces. This will make them more prominent and won’t make your face look longer than it is. You can also use highlighter on your temples and brush down through under your eyes.
- If you have an oval face, it’s best to choose whether you want to emphasize your lips or your eyes, but not both. It’s recommended you go heavier on one and lighter on the other.
Round Face
- If you have a round face you should go for a defined brow This will help your face look longer.
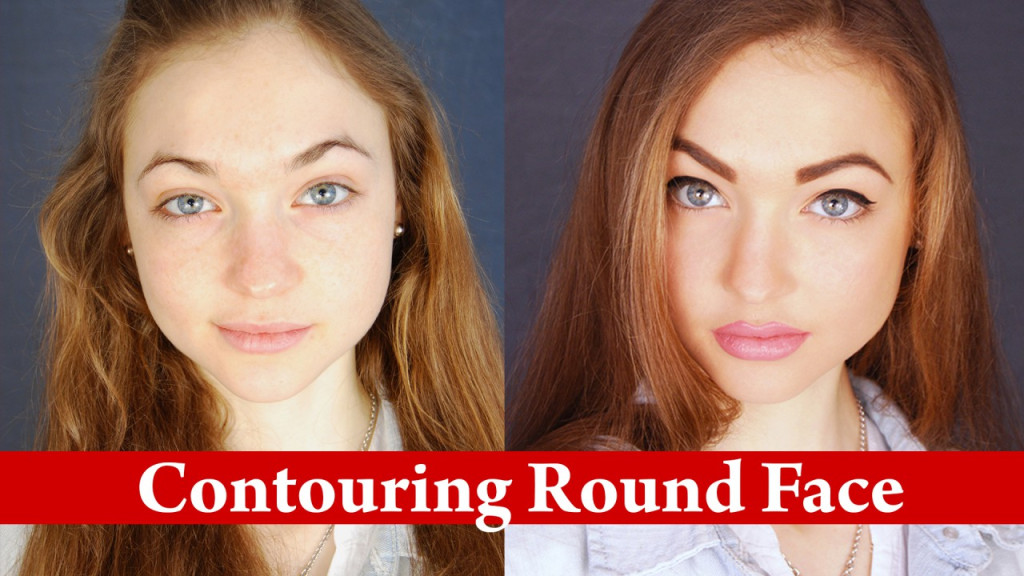
- Contouring can really help slim down a round face. Bronzer and highlighter can also help highlight certain areas of your face and make other areas look slimmer. Apply highlighter on the center of your forehead, down your nose, and then a little bit on the cheekbones. This will add some length.
- Create angles in your makeup (example: around your eyes and with your eyeliner).
- Apply lip gloss to create dimension
- Apply blush on the underside of your cheekbones. Emphasize the slimmer part on not the rounder part on your face.
It is also recommended that you apply blush in something close to a teardrop shape starting at the highest point of the cheekbone and blending out towards your temple.
Square Face
- Thick brows look good on square faces.
- Low-light your cheekbones so you don’t emphasize the squareness of your features. Keep blush light and low-key.
- Emphasize your lips! Bring out those curves and softness. Your eyes are another great feature to emphasize to draw eyes away from harsher lines. Create soft angles and roundness with your makeup.
- Use highlighter on your forehead because it will help the square shape of your face soften.
- If you want to emphasize your beautiful angles, then contouring can be a great way to highlight those great lines.
Heart Face
- A natural, gentle curved brow looks great on heart shaped faces.
- You can widen and balance your face by using lighter concealer and highlighter on your chin. Alternately, you can use a darker foundation on the top of your forehead and temples to create the look of a slimmer forehead.
- Bring out your cheekbones and eyes—apply concealer or lighter shade of foundation across your cheekbones and under your eyes. Make your eyes pop with some of the tips I suggested for eyes earlier. Remember when you use dark tones you’ll want to lighten them with some shimmer so they don’t sink into your face.
- Contour and bronzer are some of your best friends.
- Go easy on the blush. If you do use blush, make a vertical sweep upwards very lightly.
And remember to blend well! That’s important for everything.
Stay beautiful inside and out, Smart Moms!
