Street Smart Mom’s Guide to Changing Car Oil
auto, car, DYI, filter, lube, mechanic, oil, oil change, performance
2 Comments
Hey there Smart Moms!
By raise of hands, how many of us actually know how to change our car oil?
How many even know when our car’s are supposed to get an oil change?
If your hand stayed at your keyboard or on your mouse, then have I got a post for you!
FYI, around 3,000 miles (though I’ve heard you can really push it further, mechanics just want you to come in more frequently so they make more money) you’re supposed to change out the oil in your car.
Realistically it probably happens around mile 5,000 for me.
It’s just one of the many little chores that have a way of stacking up and grinding on my nerves until it gets done. And it usually costs another $30 that I can’t always afford to part with. I would much rather put it towards groceries or my daughter’s dance lessons.
Smart moms are frugal and self-sufficient.
They also need their cars in tip-top shape.
Also also, they want their kids to see them as super-cool know-it-alls.
So I set about to learn how to do it myself. And now I will share that knowledge with all of you! Because we know-it-alls have to stick together.
Now, as sexy as this is not going to be–grab a wrench and let’s get started!

Some advice:
- Check your owner’s manual for the right equipment first
- Get the right oil for your car (mine is listed on the oil cap but you can find it in the manual as well)
- Put a large plastic sheet under where you’ll be working so it doesn’t stain your drive-way
- Have all your supplies close to you in a pan or something so that you don’t have to get up and down. It just takes you out of the mood.
You’re going to need:
- A car jack
- Car jack stands (Safety)
- Box-end wrench (Lots of opinions on wrenches. Box-end is the most popular and seems to be the most correct for experts)
- Socket wrench (Another wrench which was suggested, but a lot of experts seemed to agree to never use an adjustable or socket wrench on drain plug. Use the appropriate size box-end wrench for it) (1)
- Filter wrench
- Funnel
- Rags
- Engine oil
- Oil filter (Check manual for what kind. Or an employee at and auto-parts store. Just know your car info!)
- Filter gasket (If required)
- Container for used oil (A milk jug could work fine, but I think seal-tight oil drain pans are easiest)
Our fun-time outfit:
- Safety glasses might be nice
- Rubber gloves
- Old jeans
- Old shirt (bleach stains are a nice touch)
The Dirty Part of Changing Your Oil
 The Warm-Up
Let your car run for about 5-10 minutes to get the oil warm. This will help it come out more quickly–so be careful not to get it on you when you drain it. Unless you’re into that. I guess.
The Prop-Up (Positioning)
Make sure car is in park. Apply parking break. Put blocks of wood or something to put behind the tires on the ground (this will help it keep from slipping back). Don’t worry, it will be very secure when all is done right. Just take those extra precautions to be safe.
Make sure to jack your car up in the right areas (car manual should have that). Then place your jack stands for that extra security. (2)
Make sure it’s stable by rocking your car a bit to test it out.
Get Under Your Car
The First Act
Remember lefty-loosey.
Place your drain container beneath your car’s oil pan.
The drain plug (should be a bolt standing alone down there) ought to be directly above the drain container.
Use a box-end wrench(1) to loosen it then unscrew the rest of it by hand. Let it drain into your container.
Remember to take off the cap up top as well. This will help it drain faster.
Clean up your drain plug. It’s the nice thing to do.
Let it drain (usually about 10 minutes).
When tightening the drain plug back in, you can use a ratchet to make it nice and tight. Tighten it as much as you can without using something large and forceful as you can over-tighten it and strip the threads (which is not a happy thing). (3)
Wipe up the undercarriage with an old rag.
The Second Act
Next you take care of the filter.
More oil will come out when you remove this so place your container accordingly.
This process will be a bit more specific to your type of filter. Like I mentioned above, checking out your car manual and asking an expert when you go to pick one up should tell you everything you need to know. This is also where your filter wrench could come in handy, though I recommend tightening it back on by hand. (1,2)
Filters usually aren’t put on super tight, but they can become tight because of the swelling of the gasket over time. You pretty much only want to use the filter wrench until it’s loose and letting oil flow, then do the rest by hand. (3)
The mess is part of the fun!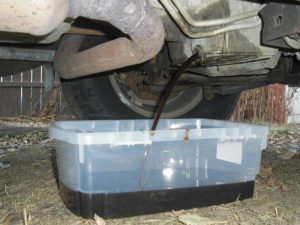
And unavoidable.
That’s why you’re prepared with rags and the plastic sheet.
Make sure your rubber gasket comes off with it. You might have to peel it off. If you stack o-ring on o-ring it won’t seal. This could ruin your engine as your new oil flows out. Which is just way more trouble than anyone wants. So double-check it!
Get your new filter ready by smearing some new car oil on its o-ring so it’s nice and ready to seal.
Again, I think this is good to do by hand (so maybe take off the gloves now) because you can get a better grip and tell how tight you’re getting it.
The ideal tightness is no more than three-quarters to a full turn past where the o-ring first connects with the surface (again, check your manual for the correct amount). (3)
You’re an Oil Changing Rockstar!
Finishing Up
After making sure you’re the undercarriage parts of your car are all taken care of, cleaned up, and fastened, you can now pour in your fresh, new, sexy oil.
Again, make sure you’re using the right type for your car!
Using a funnel to pour it in is the easiest way to not make a mess.
After replacing the cap, run your car for a minute to let everything circulate. Turn it off and check your work. Look around under your car and hood to make sure everything is sealed up nice and tight. There shouldn’t be any leaks if you did the job right.
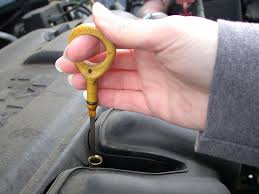
Once you have your car back down and level, remember to check the oil level. Sometimes you have to fill it up a little more.
And there you are.
Smart, sexy, totally cool, and know-it-all mom.
Sources for this article:
(2) http://www.wikihow.com/Change-the-Oil-in-Your-Car
(3) http://www.edmunds.com/how-to/how-to-change-your-oil-the-real-down-and-dirty.html
Additional sources viewed for the article:
– http://www.thecarconnection.com/tips-article/1000815_the-do-it-yourself-oil-change
– http://lifehacker.com/how-to-change-your-cars-oil-1598482301
– http://www.dummies.com/how-to/content/how-to-change-the-oil-in-your-vehicle.html
– http://www.machinerylubrication.com/Read/443/oil-changes
– http://www.pennzoil.com/learn-about-motor-oil/changing-your-own-oil/
June 27, 2016 @ 2:32 pm
Thanks for the great information, it really comes in handy.
June 29, 2016 @ 5:28 pm
I’m so glad you are liking it!